 Magazine :
How to Remove Backgrounds From Images: A Comprehensive Guide

Removing backgrounds from images is a crucial skill for many professionals, from graphic designers and marketers to online sellers and social media managers. The ability to isolate subjects from their backgrounds allows for a wide range of applications, including creating professional headshots, enhancing e-commerce product photos, and preparing images for various creative projects. This guide will walk you through the process of background removal, introduce effective tools, and provide tips for achieving the best results.
Understanding Background Removal
Background removal involves isolating the main subject of an image from its background. This process is essential for creating clean visuals, improving focus on the subject, and allowing for seamless integration into new contexts or designs. The primary goal is to achieve a high-quality cutout that retains the integrity of the subject while eliminating any unwanted background elements.
Why Background Removal is Important
- Professional Appearance: A clean background enhances the professionalism of images, particularly in business settings, such as for headshots or product photography.
- Versatility: Images with transparent or customizable backgrounds can be easily adapted to various media and contexts, making them more versatile for marketing and design purposes.
- Focus on the Subject: By removing distractions from the background, the subject becomes the focal point of the image, improving visual clarity and impact.
Choosing the Right Tool for Background Removal
Several tools and software are available for background removal, ranging from manual methods using photo editing software to automated solutions powered by artificial intelligence (AI). For those seeking efficiency and precision, AI-powered tools have become a popular choice.
One such tool is BG Remove, which utilizes AI to deliver high-precision background removal. BG Remove is designed to automatically identify and extract the subject from the background with minimal user intervention. This tool is particularly useful for those who need to process multiple images quickly and accurately.
Benefits of Using BG Remove
- High Precision: BG Remove uses sophisticated algorithms to ensure that the edges of the subject are clean and free of artifacts.
- User-Friendly Interface: The tool is designed to be intuitive, making it accessible even to those without extensive image editing experience.
- Batch Processing: BG Remove allows users to process multiple images simultaneously, saving time and effort.
Step-by-Step Guide to Removing Backgrounds
Step 1: Prepare Your Images
Before starting the background removal process, it’s essential to prepare your images. Ensure that your images are in a compatible format, such as JPEG, PNG, or WebP. For optimal results, choose high-resolution images where the subject is clearly distinguishable from the background.
Tips for Preparing Images:
- High Contrast: Images with high contrast between the subject and background generally yield better results.
- Simple Backgrounds: While advanced tools can handle complex backgrounds, simpler backgrounds make the process smoother and more accurate.
Step 2: Upload Your Image
To begin the background removal process using BG Remove, upload your image to the tool. The interface is straightforward, typically featuring an upload button where users can drag and drop their files or select them from their device.
How to Upload:
- Click on the upload button or drag your image into the designated area.
- Wait for the tool to process the image. This step usually takes just a few seconds, depending on the image size and complexity.
Step 3: Review and Adjust
Once the background removal is complete, review the result to ensure the subject has been accurately isolated. BG Remove will provide a preview of the cutout image with a transparent background by default.
What to Check:
- Edge Accuracy: Ensure that the edges of the subject are clean and not jagged. Some tools may leave rough edges that require further refinement.
- Residual Background Elements: Verify that there are no remnants of the original background left in the final image.
If needed, make adjustments to the cutout. Some tools, including BG Remove, allow for additional editing, such as refining the edges or making minor corrections.
Step 4: Save or Replace the Background
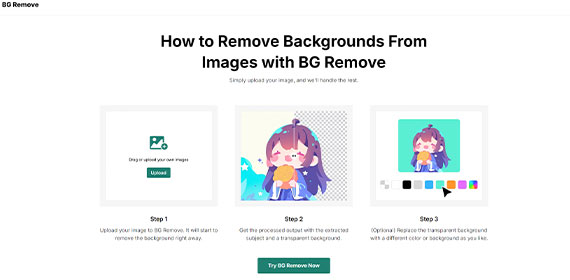
After achieving a satisfactory cutout, you can either save the image with a transparent background or replace it with a new background. BG Remove provides flexibility in this regard.
Options for Background Replacement:
- Transparent Background: Ideal for overlaying the subject onto other images or backgrounds.
- Solid Color Background: Choose a color that complements the subject or suits the intended use of the image.
- New Scene or Background: Upload or select a new background to integrate with the subject, creating a cohesive final image.
Steps to Replace the Background:
- Choose the background replacement option in BG Remove.
- Upload or select the desired background.
- Adjust the placement and size as needed to fit the subject.
Step 5: Download and Use Your Image
Once the background removal and any necessary adjustments are complete, download the final image to your device. The image is now ready for use in various applications, from marketing materials to social media posts.
Downloading Your Image:
- Click the download button or link provided by BG Remove.
- Save the file to your preferred location on your device.
Tips for Effective Background Removal
- Use High-Quality Images: Higher resolution images result in more accurate and cleaner background removal.
- Select the Right Tool: Choose a tool that matches your needs, whether it's for occasional use or frequent batch processing.
- Manual Adjustments: Be prepared to make manual adjustments if the automated process does not achieve perfect results.
- Keep Original Files: Always keep a copy of the original image in case further adjustments or different edits are required.
Common Challenges and Solutions
Handling Complex Backgrounds
Complex backgrounds with intricate details or similar colors to the subject can pose challenges. To address this:
- Choose High Contrast Images: Higher contrast between the subject and background simplifies the removal process.
- Refine Manually: Use additional editing tools to fine-tune the results if necessary.
Dealing with Rough Edges
Sometimes, the background removal process may leave rough or uneven edges. To resolve this:
- Edge Refinement Tools: Use image editing software to smooth and refine edges.
- Post-Processing: Perform additional post-processing to clean up any imperfections.
Conclusion
Removing backgrounds from images is a valuable skill that enhances the presentation and usability of visual content. By understanding the process and utilizing tools like BG Remove, users can achieve high-quality results with efficiency and ease. Whether for professional headshots, e-commerce product photos, or creative projects, mastering background removal opens up numerous possibilities for improved image quality and versatility.
With the steps outlined in this guide, individuals can confidently tackle background removal tasks and produce polished, professional images for a variety of applications.


